
How to Use a Manual Floor Cutter Like a Pro (Step-by-Step Guide)
Using a manual floor cutter is a straightforward process that leads to cleaner, faster, and more precise flooring installations. Follow these steps for optimal results:
Step 1: Set Up on a Flat Surface
Begin by placing your floor cutter on a flat, stable surface that's close to your working area. This setup is crucial for:
Accurate cuts: A stable base prevents wobbling and ensures precision.
Safe leverage: You'll have proper support when applying pressure to the handle.
Easy access: Keeping it nearby saves time and effort during installation.
Step 2: Measure and Mark Your Cut
Measure the exact length your plank needs to be using a tape measure. Once you have your measurement, mark the cutting line clearly on your plank with a pencil or chalk.
Tip: Always double-check your measurement before making any cuts to avoid costly mistakes.
Step 3: Align the Plank on the Cutter Base
Carefully slide the plank onto the cutter bed. Ensure that:
The marked line is precisely aligned with the blade of the cutter.
The edge of the plank is straight against the fence (the guide that keeps the plank in place).
The surface (decorative) side of the plank is facing up to ensure a cleaner finish.
Step 4: Adjust the Cutting Angle (if needed)
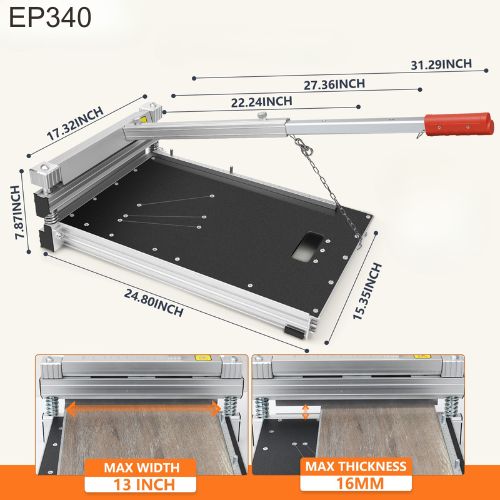
Many high-quality manual cutters, such as the EA340, offer the flexibility to make cuts at angles ranging from 0° to 45°.
If your project requires angled cuts for corners or diagonal layouts, use the built-in guide on your cutter to set the desired angle.
Step 5: Make the Cut
Firmly grip the handle of the cutter and press down with a controlled, even motion.
You should hear a distinct "snap" as the blade cleanly slices through the material.
There's no need to rush; manual cutters perform best when steady pressure is applied.
Pro Tips for Better Results
To achieve the best possible cuts and extend the life of your tool, keep these tips in mind:
Keep the blade clean: Regularly wipe off any dust and debris after use to maintain sharpness and precision.
Replace worn blades: If you notice that your cuts are becoming rough, splintered, or inconsistent, it's a clear sign that the blade needs to be replaced.
Cut with the decorative side up: This technique ensures a cleaner, more professional finish on the visible surface of your flooring.
Use a cutter matched to your flooring: Different flooring materials require different levels of cutting power. For example, SPC (Stone Plastic Composite) flooring often requires stronger models like the EC340.
Why Manual Cutters Beat Power Tools for Most Jobs
Manual floor cutters offer significant advantages over electric saws for many flooring installation tasks, particularly for indoor projects.
| Feature | Manual Cutter | Electric Saw |
| Dust-Free | Yes | No |
| Noise Level | Silent | Loud |
| Setup Time | Instant | Longer setup |
| Portability | High | Low |
| Ideal for Indoors | Absolutely | Needs ventilation |
Recommended Manual Floor Cutters
Choosing the right manual cutter depends on the type of flooring you're working with and your experience level:
EA340: An excellent all-around choice for vinyl, laminate, and SPC flooring. It supports 0°–45° angle cutting, boasts a 20,000+ cut life, and delivers dust-free, precise, professional-level results.
ECA340: This lightweight option is perfect for beginners and ideal for cutting soft vinyl and LVT (Luxury Vinyl Tile).
EC340: A heavy-duty tool designed for contractors, capable of handling dense SPC with ease.
Final Thoughts
Whether you're a seasoned professional installer or tackling your first DIY flooring project, mastering the use of a manual floor cutter will undoubtedly make your job cleaner, faster, and more precise.
Enjoy the benefits of no dust, no noise, and no hassle. Learn this skill once, and it will prove invaluable for every flooring project you undertake.
 Precision in Every Cut: Why Professional Buyers Choose Afflux Flooring Cutters
 From Order to Shipment – The Story Behind Our Flooring Cutter Production
 Boost Your Inventory with Premium Manual Flooring Cutters
 Say Goodbye to Dust: The Rise of Manual SPC Flooring Cutters